Hi guys,
I know it's been a very, very, very long time since I last posted anything, but I have decided that instead of Cooking With Kam, the blog will now focus on baking! Unfortunately I couldn't change the URL name due to a few technical difficulties, but I just wanted to give you a heads up that from now on I will just be focusing on all things baked! As I am currently on my year abroad, the next few months might be a bit slow, but will definitely pick up when I return to England next year. I am really excited about this re-vamp, as I am an avid baker, and think it's actually time that I start to properly document my bakes, rather than just Instagramming them (of which I am extremely guilty!).
Hopefully you guys can embrace the change as much as I have, and I look forward to the exciting times there are lying ahead!
Look out for my first official 'Baking With Kam' post which will be up fairly soon.
Tuesday, 18 November 2014

Tuesday, 10 September 2013
Goat's Cheese and Red Onion Tart
As 'Tart Week' approaches this evening on The Great British Bake Off (which I am extremely excited/apprehensive about - praying for no soggy bottoms!), it reminded me of the goat's cheese and balsamic onion tarts I made a few weeks ago. I was at the shops and saw some ready rolled shortcrust pastry which was reduced and thought I'd give it a go as I'd never made tarts before. I opted for goat's cheese and red onion tart as I know they're classic flavour combinations and the family needed to be fed! I have caramalised onions before so I googled a recipe just for some guidance and ended up on BBC Good Food. I'll post the link to the original recipe, but I altered it quite a bit and they ended up tasting incredible so feel free to try either!
This is the original recipe: http://www.bbcgoodfood.com/recipes/5753/goats-cheese-and-red-onion-tarts
However, this is the way I decided to it... I didn't really measure anything out, so posting an exact recipe will be difficult but I'll try my best.
 INGREDIENTS
500g block shortcrust pastry
2 red onions
balsamic vinegar
dark brown soft sugar
bunch thyme
olive oil
salt and pepper
pack goats cheese
METHOD
1. Heat oven to 200C fan/180C gas. Line 6 tart tins or 1 large tin with pastry and prick bottoms. Line with parchment and baking beans and bake for 10 mins. Lift out parchment and bake for a further 5 mins. The pastry should be crisp, dried and cooked.
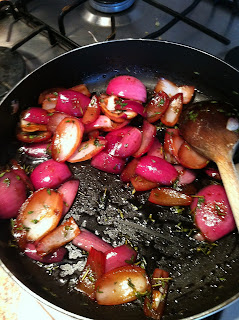
2. Meanwhile, slice the red onion. Heat some olive oil in a pan and fry the onion until they start to soften. Throw in a few lugs of balsamic vinegar, half the bunch of thyme and bubble. Add dark brown soft sugar and season to taste - for me this took away some of the sharpness of the balsamic vinegar and added a different dimension to the flavour of the onions.
3. Place the onions in the tart case(s) and crumble some goats cheese on top. The reason I crumbled rather than actually slicing 6 round slices was because it was physically impossible to cut neat rounds!
4. Bake until the goats cheese starts to brown and bubble - then enjoy!
Okay, so I know it isn't the most pretty thing in the world - presentation isn't my strong point. Butttt, when I'm feeding my family it's the last thing I think about! Anyway, they enjoyed it so much that my mum actually treated me to some tartlet baking cases and the very next week I made some mini ones instead. I even made my own pastry! Here are the results...

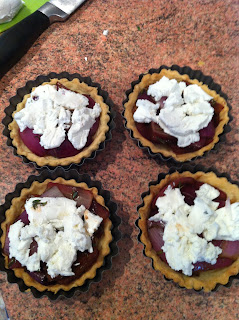
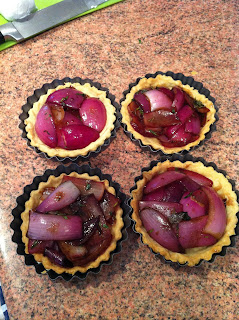
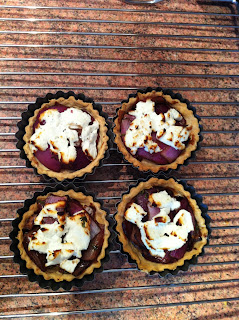
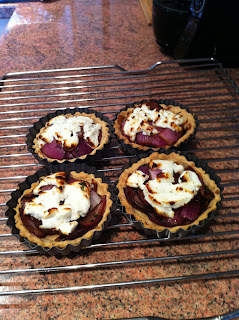
These are actually a lot easier to make than you may think. Making my own pastry was stressful, as I didn't know what it was actually supposed to be like. However it came out crisp, short and how it was supposed to be so if I can do it, it can't be that hard!
I've been quite experimental recently and the next post is going to be about my battle with macaroons!
This is the original recipe: http://www.bbcgoodfood.com/recipes/5753/goats-cheese-and-red-onion-tarts
However, this is the way I decided to it... I didn't really measure anything out, so posting an exact recipe will be difficult but I'll try my best.
 INGREDIENTS
500g block shortcrust pastry
2 red onions
balsamic vinegar
dark brown soft sugar
bunch thyme
olive oil
salt and pepper
pack goats cheese
METHOD
1. Heat oven to 200C fan/180C gas. Line 6 tart tins or 1 large tin with pastry and prick bottoms. Line with parchment and baking beans and bake for 10 mins. Lift out parchment and bake for a further 5 mins. The pastry should be crisp, dried and cooked.
2. Meanwhile, slice the red onion. Heat some olive oil in a pan and fry the onion until they start to soften. Throw in a few lugs of balsamic vinegar, half the bunch of thyme and bubble. Add dark brown soft sugar and season to taste - for me this took away some of the sharpness of the balsamic vinegar and added a different dimension to the flavour of the onions.
3. Place the onions in the tart case(s) and crumble some goats cheese on top. The reason I crumbled rather than actually slicing 6 round slices was because it was physically impossible to cut neat rounds!
4. Bake until the goats cheese starts to brown and bubble - then enjoy!
Okay, so I know it isn't the most pretty thing in the world - presentation isn't my strong point. Butttt, when I'm feeding my family it's the last thing I think about! Anyway, they enjoyed it so much that my mum actually treated me to some tartlet baking cases and the very next week I made some mini ones instead. I even made my own pastry! Here are the results...


These are actually a lot easier to make than you may think. Making my own pastry was stressful, as I didn't know what it was actually supposed to be like. However it came out crisp, short and how it was supposed to be so if I can do it, it can't be that hard!
I've been quite experimental recently and the next post is going to be about my battle with macaroons!
Thursday, 15 August 2013
Hangover Cure: Part 1
On Monday night, I experienced my first work social with the guys from the pub as my manager is leaving. It was really fun, however it's safe to say I paid a price for that the next morning! After having had about 4 hours sleep and passing through the 'I don't want to go anywhere near food' stage of the day, manic hunger took over my whole body and I decided to make a quesadilla. I first encountered these when my mum bought a Nigella Lawson cookbook about 5 years ago and they've been a favourite for lunch ever since. For anyone who doesn't know, a quesadilla is a tortilla wrap filled with cheese as the main ingredient and then anything else that you fancy. It originated in Mexico and there are many different variations as people have experimented over the years. Once the wrap has been filled with ingredients, it is then folded in half to form a crescent shape and then fried or toasted.
Seeing as there was some left over chilli con carne from the night before, I saw it fitting (even in my hungover state) to keep the Mexican theme going and make a chilli and cheese quesadilla. I cannot express how INCREDIBLE the end result was. I would completely recommend it to anyone who isn't feeling 100% after a night out. I will definitely be making these in my student house in Nottingham this year! As you may remember, the facilities in my halls of residence were rubbish and therefore I am excited about the prospect of having an oven and a hob in our new house.
All you need is: 1 tortilla wrap, 4-5 slices of cheddar and 2-3 tablespoons of chilli con carne. Lay the cheese and chilli on one half of the wrap, fold in half and then fry or toast! The outcome is a deliciously cheesy, meaty, flavoursome toasted wrap that is guaranteed to cure any hangover. If you can't be bothered with the effort of the quesadilla, try some chilli with grated cheese on top - guaranteed to do the trick!
 |
| I know this picture isn't the best - I got a bit excited and started eating before I remembered to take a photo... Oops! |
 |
| Trusty bowl of chilli |
Thursday, 1 August 2013
Throwback: Wimbledon Fever
Everyone knows that (apart from tennis) the things most closely associated with Wimbledon are strawberries and cream. Throughout the weeks that the tournament takes place, there are always promotions in supermarkets and on the television, encouraging people to buy what's on offer.
One day while the tournament was taking place, I had a sudden urge to bake, so decided to take inspiration from 'strawberries and cream' by making some mini victoria sponges. I popped up the road to Waitrose to buy all the essentials for my cakes. I don't normally shop there, but out of the three supermarkets on my local high street, it's the one that has everything you'd need to bake a good cake! While I was there, I found some heart shaped cutters which were reduced and thought that instead of making actual mini sponges, I'd make 2 bigger ones and cut them out.
Here is the recipe (Paul Hollywood) and method I used, along with some pictures to help! I decided to make butter icing instead of use fresh cream so they would last longer.
INGREDIENTS
(makes 8)
Sponge
175g unsalted butter, softened
175g caster sugar
3 eggs, beaten
175g self raising flour
Filling
3 tbsp raspberry jam
150g unsalted butter, softened
325g icing sugar (25g to dust)
1-2 tbsp vanilla essence
8 strawberries or raspberries
METHOD
1. Set the oven to 180C/gas 4. Lightly butter two sandwich tins, each with a diameter of 20cm.
2. Cream together the butter and sugar together until light and fluffy, and then slowly add the beaten egg.
3. Fold in the sifted flour and spoon the mixture into the prepared cake tins.
4. Bake for 20 minutes. Leave to cool and then remove from the tins.
5. While the cake is cooling, make the buttercream icing. Beat the butter until soft. Then add half the icing sugar and beat until smooth.
6. Add the remaining icing sugar and vanilla essence until the mixture is smooth.
7. By now, the cakes should be cool. You can now cut each cake into 4 hearts. With the left overs you can make a trifle or mini sponge, jam and butter icing bites (my brother loved these).
8. In turn, cut each of the hearts in half until you have 16 thinner hearts. Cover 8 with jam and 8 with buttercream icing.
9. Sandwich them together and dust with icing sugar. Cut the strawberries in half and place on top of the cakes for a beautiful looking wimbledon treat!


Friday, 26 July 2013
Healthy Summer
Since coming back from Italy I decided that it was finally time to lose some weight. I haven't been happy with my weight for a while now and that isn't helped by the fact that I love the experience of cooking and eating tasty food. However, my family still need to be fed, and eating healthily doesn't necessarily have to be boring. Here are 4 recipes I've found (2 soups and 2 salads) which are all under 310 calories, still taste amazing and are extremely filling!
Cream of Tomato and Basil Soup
INGREDIENTS
(serves 2, 200 cals/serving)
1 garlic clove
1 onion
1 stick celery
 1 carrot
1 tbsp olive oil
4 tbsp dried basil
1 tin chopped tomatoes
200ml vegetable stock
2 tbsp double cream/creme fraiche
handful of fresh basil
METHOD
1. Chop onion and celery, grate carrot and crush garlic clove. Cook in olive oil until softened and sprinkle over dried basil.
2. Add chopped tomatoes and vegetable stock and simmer for 15 minutes
3. Whizz ingredients in a blender, stir in double cream and add fresh basil.
NB. Only add cream and basil if eating straight away. Otherwise, refrigerate and then heat, add basil and cream before eating.
Carrot and Coriander Soup
INGREDIENTS
(serves 4, 105 cals/serving)
 1 tbsp olive oil
1 onion
450g carrots
4 tbsp ground coriander
2 pints vegetable stock
large bunch fresh coriander
salt and pepper
METHOD
1. Chop onion and carrots thinly. Heat oil in a pan and cook onion and carrots until starting to soften.
2. Stir in ground coriander and season. Cook for 2 minutes.
3. Add vegetable stock and bring to the boil. Simmer for 10/15 minutes until vegetables are tender.
4. Whizz ingredients in a blender and add fresh coriander
NB. Only add coriander if eating straight away. Otherwise, refrigerate then heat and add coriander before eating.
Griddled Chicken & Corn on the Cob Salad
INGREDIENTS
(serves 4, 236 cals/serving)
2 skinless chicken breasts
 2 garlic cloves, crushed
1 tbsp paprika
1 tsp ground cumin
juice 1 lime
2 tbsp olive oil
2 corn cobs
large handful lettuce leaves
1/2 cucumber
METHOD
1. Cut the chicken breasts into strips. Mix the garlic, paprika, cumin, lime and 1 tbsp of oil with some seasoning and cover the chicken with the marinade. Leave for at least 15 mins.
2. Heat a griddle pan to high and cook the chicken for 3/4 mins each side until cooked through. Brush the rest of the oil over the pan and griddle the corn for roughly 5 minutes until evenly cooked. Remove from pan and cut off kernels.
3. Mix the lettuce and cucumber, top with corn and chicken and your choice of dressing.
Chicken with Couscous Salad
 INGREDIENTS
(serves 4, 304 cals/serving)
200g plain couscous
1 red pepper, diced
4 spring onions, sliced
50g raisins
300ml chicken stock
2 tbsp pine nuts
juice of 1 lemon
2 skinless roasted chicken breasts
salad leaves
METHOD
1. Put couscous, spring onions, pepper and raisins into a heatproof bowl. Pour over the chicken stock and cover for 10 mins.
2. Fluff up the couscous with a fork and stir in pine nuts and lemon juice.
3. Season and serve with the chicken and salad.
All four of these recipes are filling and delicious - two words a lot of people wouldn't normally associate with healthy meals. I found all of them on the internet (BBC GoodFood) but have adapted them ever so slightly which is why I haven't just posted the direct links. I know it's summer and soup is more of a winter dish, however for me it's a really quick, easy and filling meal and adds a bit of variety to "boring old salads". Try them for yourselves and let me know how it goes!
Thursday, 18 July 2013
Fermentum
Throughout our trip to Italy, I had some of the most amazing food I've ever tasted. However, there was one meal which came out on top by a clear mile. Before we left, my gran gave us both £20 to spend while we were out there, so we decided to spend it on a meal in a restaurant called Fermentum. It was recommended to us by Alessandra and Marco - the owners of the B&B where we were staying in Rome. It was situated in a beautiful location on the outskirts of an aqueduct park on Via Lemonia and was the perfect place to spend my gran's money. Ale and Marco had told us that the pizza dough was slightly lighter than normal and that the toppings were 'special' and 'different'. We didn't really know what this meant, but seeing as we received 20% off our total bill due to where we were staying, we decided to head to Fermentum on the second night of our stay in Rome.


We left feeling extremely satisfied with the food, drink and price. Just want to say thanks to my gran for helping us to have such a lovely meal in such a lovely place! As it was outside of central Rome, it wasn't touristy at all, and it was really nice to eat in a restaurant that the locals loved as it proved just how good the food was.
We ended up eating out a bit later than we would normally as we needed a nap and relax after our tiring day out, which meant that by the time we actually got there (around 9pm) it was buzzing. There were people sat inside and out, and there was generally a really good atmosphere which made the whole dining experience really enjoyable. I'd most definitely recommend this restaurant to anyone who is travelling to Rome and/or staying in the outskirts.

 |
| Fermentum - cibando.com |
 |
| Aqueduct park - TripAdvisor |
We'd spent the whole day sightseeing around Rome and were really hungry so wanted a really filling and appetizing meal and fortunately we were not disappointed! Not sure what to have, Jack and I asked the waitress (who luckily spoke a bit of English) what she recommended. For the meat-lover she suggested the 'Pizza All'Amatriciana' (which normally comes as a pasta) so Jack went for that (even though he had no idea what was in it!), whereas I decided to have a spicy sausage, mushroom and bacon pizza. We also decided to order drinks; a beer for Jack and a glass of Prosecco for myself which was absolutely divine! Fruity, yet light and extremely refreshing.
To start, we ordered Classic Suppli, a typical Roman dish which Ale and Marco had raved about. We had no idea what to expect - apart from the fact that there was rice involved! What arrived was basically a ball of tomato flavoured rice and mozzarella. It sounds so simple yet it was so delicious! Here is the link to their facebook page - click here to see more Suppli: https://www.facebook.com/Fermentum?filter=1

It seemed as though all the locals were trying the more exotic styles of Suppli, but we had no idea how to go about ordering those and were happy enough with our classic ones. I have to say at this point that being a language student, yet not properly managing to communicate with people in their own language was quite frustrating! I didn't want to come across as a typically arrogant Englishwoman so tried my hardest to speak as much basic Italian throughout the duration of the holiday. This proved a huge struggle and explains why we didn't order more!
After our 'Suppli Starter', our pizzas arrived. We were sat right by the chef's station and therefore we could observe the whole process - from the rolling out of the dough, to the plating up of the meal, which was a real privilege. Jack described his as 'the best pizza he's ever eaten' and mine wasn't far off whatsoever. The pizzas were HUGE and Marco was right about the dough - it really was something else. As for the toppings, I'd be quite intrigued to try the Pasta All'Amatriciana and see what it's like, but the pizza exuded flavours and aromas of smokey bacon, rich tomato & parmesan and as promised was like nothing I've ever tasted before. As for mine, the kick from the spicy sausage combined with the earthiness from the mushrooms and classic toppings of bacon and mozzarella created a damn good pizza!

We left feeling extremely satisfied with the food, drink and price. Just want to say thanks to my gran for helping us to have such a lovely meal in such a lovely place! As it was outside of central Rome, it wasn't touristy at all, and it was really nice to eat in a restaurant that the locals loved as it proved just how good the food was.
We ended up eating out a bit later than we would normally as we needed a nap and relax after our tiring day out, which meant that by the time we actually got there (around 9pm) it was buzzing. There were people sat inside and out, and there was generally a really good atmosphere which made the whole dining experience really enjoyable. I'd most definitely recommend this restaurant to anyone who is travelling to Rome and/or staying in the outskirts.

To find Fermentum on the Metro (how we did) just hop off at Subaugusta on Line A and head towards the aqueduct park where you will find Via Lemonia. Follow the road down and you can't miss it. And... if you want to enjoy 20% off at Fermentum I'd most definitely recommend a stay at the B&B Acquedotti Antichi with Marco and Alessandra. They were extremely hospitable and provided amazing breakfasts! For us, their B&B was in a really good location. Not central, but close enough to the centre for us to be able to do all the touristy things that we wanted to do.
As I've said, the holiday allowed me to experience some of the most delicious food I've ever tried. However, now I'm back, I'm trying to lose some weight and therefore eat more healthily - so in the next post I'll be sharing some of my healthy meal ideas with you!
Friday, 12 July 2013
Italian Food Diary
Anyway, I've finally found time to share the delicious food I sampled when I was away in Italy with Jack. Any foodie who's been there will admit (I'm sure) that it is some of the best they've ever tried. For me, it was quite remarkable how the lack of presentation could be completely justified because there was nothing to complain about taste-wise. In 'Italian' restaurants in England, the food is trussed up - and while it may still satisfy the tastebuds, nothing can compare to the sheer, rustic Italian cuisine I experienced when I was on holiday. There were no frills. The food arrived as you ordered it, just on the plate with no fancy garnish or anything! No complaints from us tourists whatsoever.
We flew to Rome on 19th June for a couple of days to see the sights, and then moved onto Sardinia for a more relaxing stint in the sun!
 |
| Day 1. Rome. Evening meal with my first taste of 'Moretti' Beer. I have to say I was pleasantly surprised! |
 |
| Rustic Italian. |
 |
| Jack's Cotto ham and cheese calzone. As you can see we played safe at the beginning! |
 |
| My Cotto ham, cheese and mushroom pizza. |
 |
| Day 2. Rome. Breakfast served by the lovely Marco. Plums, pastries, coffee, juice and biscuits. |
 |
| Authentic Italian Espresso! |
 |
| Fruit market. |
 |
| Evening meal. Fermentum. Beer and Italian Prosecco. |
 |
| Suppli - an authentic Roman dish. There will be more on this in the next post! |
 |
| 'The best pizza I've ever eaten' - Jack Fairs. Pizza All'Amatriciana. |
 |
| My pizza with mushrooms, mozzarella and spicy sausage. I really struggled to finish this one - it was huge! |
 |
| Fermentum in the acqueduct park. |
 |
| Day 3. Breakfast. Cherries and melon replace the plums. |
 |
| Day 3. Cagliari, Sardinia. Wine served in cute little jugs! |
 |
| Small pasta with scampi, prawns and a tomato sauce. May not look appealing but tasted incredible. |
 |
| Spinach and Ricotta ravioli, Sardinian style. |
 |
| Lemon sorbetto. |
 |
| Hands down the best tiramisu I've ever had. Ever. |
 |
| Day 4. Quartu Sant'Elena, Sardinia. Diavola pizza. |
 |
| Accidentally ordered a whole bottle of wine (and finished it...!) |
 |
| Gambaretti. Don't be so shallow - looks can be deceiving! |
 |
| Toasted bread with olive oil. Simple yet so, so good. |
 |
| Day 6. Pasta al Faro. Tomato sauce, feta cheese, olives and rocket. Amazing flavour combinations. |
 |
| GELATO |
The follow up to this will be a 'meal of the holiday' post, which in both of our opinions was at Rome's 'Fermentum'. Keep checking back to find out why.
Tuesday, 21 May 2013
Microwave Mushroom Risotto
 |
| Ingredients |
I would say that this is a good recipe for students who only own a microwave because the ingredients are cheap and easy to obtain, and the method is so simple.
However, as you can probably guess, the final product wasn't a huge success. It tasted nice, but it could have been a lot better had I cooked it in a pan on the hob. Another factor which contributed to it being an average meal was that I couldn't find any parsley in the shops - which I think would have brought another dimension to the food and made it taste a lot more fresh. Having said that, I am a perfectionist and I'm sure that any student who likes risotto would enjoy this meal. I would suggest using onions or leeks instead of the spring onions though, as sadly, they pretty much disintegrated!
INGREDIENTS
(serves 3/4)
40g butter
1 leek/onion, chopped
1 garlic clove
1 cup arborio risotto rice
2 cups vegetable/chicken stock
cheese, grated (I used cheddar, parmesan would be better)
handful of parsley
 |
| Softened spring onions with garlic and butter |
METHOD
- Combine butter, leek/onion and garlic to a large microwaveable bowl. Microwave on HIGH for 2 minutes until the leek/onion is soft.
- Add rice and stir until coated with butter mixture. Microwave on HIGH for 1 minute.
- Stir in 1 cup of stock. Microwave on HIGH for 5 minutes and then on MEDIUM for a further 7 minutes.
- Stir in the mushrooms and another cup of stock and microwave for 7 minutes.
- Leave to stand for 5 minutes.
- Season with salt and pepper, and sprinkle on some parsley to finish.
 |
| I am aware that this doesn't look pretty at all! It tasted better than it looks - I promise! |
Like I've said, the recipe is simple and pretty much anyone could make this dish. However if you do have a hob handy I suggest using that instead. Just put the garlic, butter and leeks in a pan until the leeks are soft, add the rice and then coat with the mixture. Next, add the stock (and perhaps some white wine) a ladle-full at a time until it has all been fully absorbed by the rice. Finish off in the same way as the microwavable recipe suggests.
Unfortunately, I won't be able to do another post for a couple of weeks, however over summer I will be very active as I am visiting Italy where the food is incredible, and I'll have a lot more free time to cook at home. I also think I'm giving my boyfriend, Jack, a crash course in cheap and easy student cooking too so I will keep you all posted on how that goes!
If you're a student out there and fancy trying this recipe out, let me know how it goes with the amendments I made to my own experience!
Subscribe to:
Posts (Atom)